How to Print Overlays Made with AbleNet Symbol Overlay Maker from a Mac Computer


Overview
This guide will cover how to print a symbol overlay from the Symbol Overlay Maker app installed on a Mac computer. The app is available for Mac computers and can be installed from the Mac App Store.
The app is only available for Mac computers running macOS 12.0 or later and with an Apple M1 chip or later. Any Mac made after 2021 will meet this criteria. If you are unsure, this resource from Apple will tell you how to check which chip your Mac has. For instructions on how to print an overlay from an iPad to an older Mac computer, please click here.
Required Items
- A Mac computer
- Symbol Overlay Maker
- Click here to download it from the App Store.
- A printer
- a PDF reader such as Preview or Acrobat.
How to Print From the Symbol Overlay Maker App
- Open Overlay Maker app.
- Either create a new symbol overlay or open an existing symbol overlay. Detailed instructions for how to create an overlay can be found here.
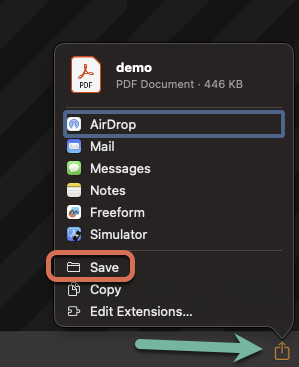
- Once your desired overlay is open, tap the share button in the bottom right corner of the window. It looks like a square with an arrow pointing upwards (see photo below).
- Select Save as shown below.
- Save the overlay to your Desktop or other location on your Mac.
- Close the Symbol Overlay Maker window.
- Open your saved overlay. You can do this one of two ways:
- Find your saved overlay where you saved it and double click to open.
- Open your PDF reader, click File > Open.
- Press ⌘ + P on your keyboard or click File > Print.
- Ensure the following settings are set before printing:
- Orientation: Landscape
- Scale: 100%
- Full Color
- Click Print.
- Cut out your overlays after printing, and they will be ready for use!
Tips and Troubleshooting
If you are having issues printing, we suggest emailing the exported overlay or putting it on a USB drive to print from a different computer or printing from the printer control panel.
If you are having issues creating and exporting the overlay you have created, please visit the Support Hub for additional support articles, or contact the ableCARE Product Success Team for further assistance.
Was this article helpful?
0 of 0 found this helpful