Legacy Keyguard Information for MagConnect Devices


This article provides keyguard information for older QuickTalker Freestyle speech devices with a round MagConnect attachment on the back (see image below).
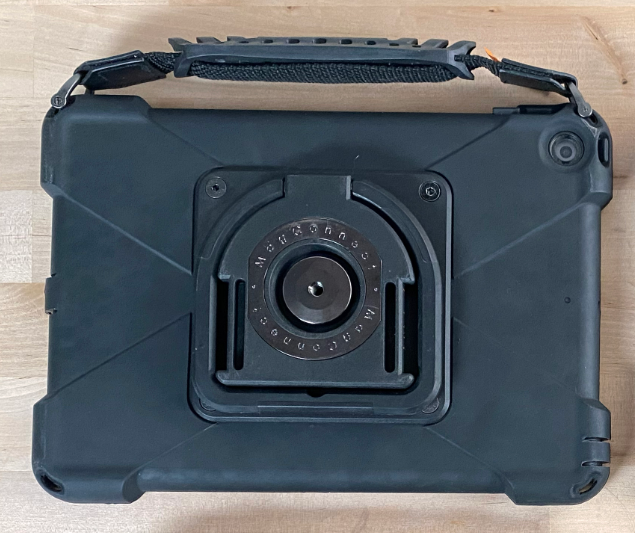
If you have a newer device with four threaded holes and one or more QR codes on the back kickstand, view the Integrated sideCLICK keyguard article instead.
Is This Article Right for My Device? 🔗
This information applies to:
- QuickTalker Freestyle – MagConnect
- QuickTalker Freestyle Mini – MagConnect
Check your device: Look at the back of your device. You have a legacy device if you see a round MagConnect attachment on the kickstand without any QR codes or threaded holes on the kickstand.
Have a different device? If your device has four threaded holes and one or more QR codes on the kickstand, you have the newer version. View Integrated sideCLICK keyguard information.
MagConnect Keyguard: sideCLICK with Clips 🔗
For QuickTalker Freestyle – MagConnect devices, sideCLICK with Clips keyguards are still available free of charge to all QuickTalker Freestyle users.
sideCLICK with Clips keyguards use clips that attach to the camera side and charge port side of your device, with the keyguard locking into the clips for a secure fit.
Order a sideCLICK with Clips keyguard
How to Install sideCLICK with Clips Keyguards 🔗
The video below demonstrates how to install the sideCLICK with Clips Keyguard to your MagConnect QuickTalker Freestyle or QuickTalker Freestyle Mini.
Step 1: Attach the Clips
Your sideCLICK with Clips keyguard comes with two clips: one for the camera side and one for the charge port side.
- Position the clip at the edge of your device
- Attach the top side of the clip (screen side) first
- Press firmly on the clip so the back side slides into place
- Repeat for the second clip on the opposite side
Step 2: Install the Keyguard
- Align and insert the two tabs on the keyguard into the holes on one of the clips
- Firmly press down on the other side of the keyguard to lock it in place
To remove the keyguard: Firmly pull up from the middle to release the keyguard from the clips. The clips can remain attached to your device.
If You Received a Replacement Device 🔗
If you previously had a QuickTalker Freestyle – MagConnect and received a replacement QuickTalker Freestyle – Four Threaded Holes through warranty, your existing sideCLICK with Clips keyguard and clips won’t fit the new device.
You can order a new Integrated sideCLICK keyguard for your replacement device free of charge for all QuickTalker Freestyle users
When to Request a New Keyguard 🔗
You might need a new keyguard if:
- Your speech app layout has changed and the current keyguard no longer matches your button arrangement
- The keyguard or clips have become damaged or worn
- You want to switch between clear and black keyguard options
- You received a replacement device and need a keyguard for the new unit
All keyguard requests, including modifications and replacements, are included as part of ableCARE coverage at no additional cost
Request a new or replacement keyguard
Discontinued Keyguard Attachment Methods 🔗
The following methods for attaching keyguards are discontinued. These are here for reference only.
Suction Tape (Discontinued)
Suction tape keyguards used microscopic suction technology to adhere directly to the device screen.
How to Install Suction Tape Keyguards:
- Remove the keyguard and suction tape from the packaging
- Line up the keyguard with your app layout to determine the correct orientation
- Flip the keyguard face down on a flat surface
- Use scissors to cut small strips from the suction tape
- Peel off the white backing and attach the suction tape to the keyguard edges
- Peel off the clear side and adhere the keyguard to the screen
Note: Suction tape uses microscopic craters to create partial vacuums between the tape and screen, similar to a suction cup. Clean the screen before applying for best results.
Magnetic Connection (Discontinued)
Magnetic keyguards used metal attachment plates adhered to the device case, with magnets embedded in the keyguard creating a secure connection.
How to Install Magnetic Connection Keyguards:
- Remove the keyguard and metal attachment plates from the package
- Clean the area around the screen where the rectangular metal attachment plates will be placed with alcohol
- Allow 30 to 60 seconds for the area to dry completely
- Peel away the backing on one metal attachment plate
- Place the metal plate on the device case in one of the designated rectangular areas
- Repeat steps 4 and 5 for the remaining three metal plates
- Attach the keyguard to the device case
Magnet Strength Specifications:
1 1/2 inches away: effectively 0 millitesla (0 gauss)
Directly over the magnet: 250 milliteslas (2,500 gauss)
1/4 inches away: 33.8 milliteslas (338 gauss)
Still Stuck? 🔗
The ableCARE Product Support Team is here to answer your technical questions!
Was this article helpful?
1 of 1 found this helpful